The outdoors is alive with signals. Step quietly into the forest and you’ll see trees bending toward the sun, hear birds calling warnings, feel winds shifting before a storm, and notice plants responding to moisture and light. To the untrained eye, these details slip by unnoticed. But to those who pay attention, the land becomes a textbook, one filled with practical knowledge for survival and self-reliance.

For centuries, hunters, gardeners, farmers, and travelers have relied on nature’s subtle cues to forecast weather, find water, or navigate terrain. Learning to interpret those cues today connects us with the same wisdom that guided our ancestors, and it sharpens our awareness as modern outdoorsmen.
In this article, I’ll share some of the most valuable “secret signs” you can begin noticing right now, from plants and animal behavior to skies and winds.
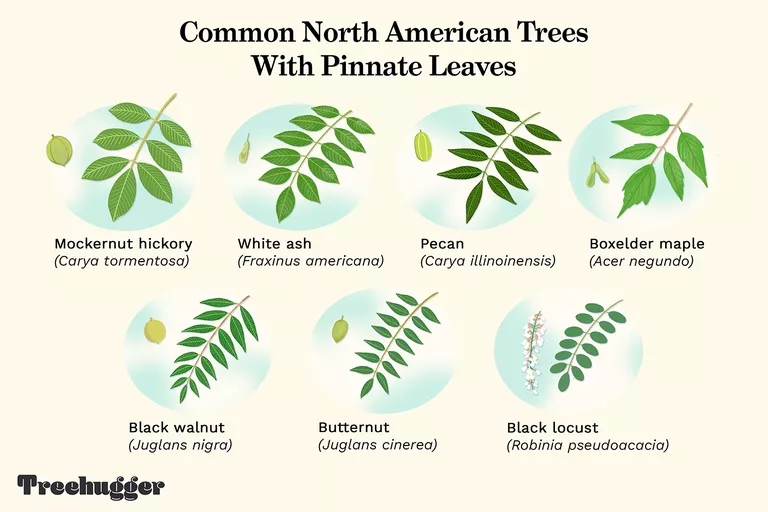
Plants as Nature’s Billboards
Plants do more than tell you their name; they tell you about the land they grow in.
- Moisture indicators: Certain species reveal hidden water. Willows, sycamores, and cottonwoods thrive in damp soils, even when the landscape looks dry. Cattails and lush grass often mark seeps or springs.
- Growth direction: Plants lean toward the sun. In open areas of the Northern Hemisphere, trees are often fuller on their southern sides. Combine this with other clues, and you can orient yourself.
- Seasonal cues: Some flowers and pinecones react to humidity, often closing before storms. I’ve noticed morning glories and chicory doing this, while white pine cones will tighten ahead of rain.
Once you begin reading plants, you’ll see more than just greenery. You’ll recognize water sources, approaching weather, and even direction.
Tracks and Animal Behavior
Animals are finely tuned to their environment, and their behavior can reveal far more than we realize.

- Trails to resources: Game trails often lead to water, food, or shelter. Following them carefully can reveal creeks or seeps.
- Bird language: Birds are excellent sentinels. Sudden silence, raucous alarm calls, or quick flights often mean a predator, or even a person, has entered their space. Turkeys cluck as an alarm, while squirrels freeze in place at the shadow of a hawk.
- Insects: Bees fly in straight “bee lines” between the hive and the water. Mosquito swarms indicate nearby dampness.
- Behavioral alarms: When a group of deer lifts their heads in unison, staring alertly, something has disturbed them.
Tracks, scat, and sign also reveal habits of wildlife. I once found persimmon seeds in coyote scat, which led me to a nearby persimmon tree, a sweet bonus I wouldn’t have noticed otherwise.
Reading the Sky
The sky has been humanity’s weather forecast for millennia. With a bit of practice, you can read it too.

- Clouds: Wispy cirrus clouds mean weather change is coming. Puffy cumulus usually signals fair weather, unless they build vertically into thunderheads. Rippled altocumulus (“mackerel scales”) often foretell an approaching front.
- Color cues: A halo around the sun or moon is caused by ice crystals and often signals incoming moisture. The old saying “red sky at night, sailor’s delight; red sky in morning, sailors take warning” still rings true.
- Light changes: Yellowish, heavy light or dark horizons mean storms are forming fast.
Learn to “read the ceiling,” and you’ll carry a free barometer wherever you go.
Wind and Weather Shifts
Wind tells its own story. It moves according to pressure, temperature, and terrain, and those movements reveal what’s coming.
- Smell of rain: That earthy scent when rain is near, petrichor is the fancy word for it, often arrives before the storm itself.
- Direction shifts: Changing wind direction can mean a new front is pushing in. Winds from the east often signal the approach of storms, while steady west winds bring calmer weather.
- Stillness: When woods suddenly grow calm and leaves flip to show their undersides, barometric pressure is dropping, a sure sign of fast-approaching storms.
- Feel and sound: Humid air feels heavy and muffles sound; dry air carries sound farther. Even your skin can detect subtle changes.
Hunters often use simple wind checks, like tossing dry leaves, to see where their scent is drifting. The same practice can help anyone anticipate the weather.
Finding Water Through Natural Signs
Water is life, and nature constantly leaves clues about where to find it.

- Vegetation: Green, lush growth in a dry area almost always indicates moisture below.
- Birds and insects: Birds flying at dawn and dusk often head to water sources. Mosquitoes and midges gather where it’s damp.
- Geology: Gravel beds, dry stream channels with fresh growth, and rock formations funneling runoff often conceal water.
Train yourself to notice these patterns, and you’ll rarely go thirsty in the wild.
Other Subtle Signals
The woods are full of overlooked details:

- Sound: On foggy mornings, sound carries less; on dry nights, you might hear owls or coyotes from a mile away.
- Stars: At night, the North Star provides a fixed point, while constellations like Orion or the Big Dipper orient you seasonally.
- Shadows: A simple stick and shadow can show you north-south orientation.
Every sense you have can be tuned to the environment if you take the time to notice.
Why It Matters
Reading the secret signs isn’t about folklore or memorizing tricks, it’s about observation. It’s about training yourself to be present, alert, and connected to your surroundings. For survival, it can mean finding water, predicting storms, or avoiding danger. For everyday life, it builds confidence, sharpens awareness, and deepens your connection to the land.
The wilderness is always speaking. The question is, are you listening?
About the author

Craig Caudill is the Director of Nature Reliance School, where he leads in-person and online training in wilderness survival, bushcraft, tracking and disaster readiness. He is the author of multiple books on outdoor skills and has been featured as a consultant for the US Government, national television, and survival programs. With decades of experience, Craig is dedicated to teaching others how to interact responsibly with nature while building self-reliance. Learn more at www.naturereliance.org.
]]>